Wednesday, June 13, 2012

PHP and Microsoft Access Database Connection

We all know that MySQL database connection is the best way for PHP. This make us so strong during coding. But what I have to say is that is not the only way. We have some opinions about connecting to databases. These may be between PHP&Access, PHP&Sqlite and PHP&PostgreSQL etc. But here, we interested in the first one, PHP&Access.

Access is one of the most popular databases in the world. It was made by Microsoft Corporation. You can find here more information about Access. A person who uses the Access can create, update, delete, etc tables on databases without using SQL.  That's why we can see easily how important  the interface is. In this respect this is so simple and useful.


An Example on Access : Getting data from access


<?php
$conn = new COM("ADODB.Connection") or die("ADODB Oops!");
$conn->Open("DRIVER={Microsoft Access Driver (*.mdb)};DBQ=C:\Users\UserName\Desktop\ MyDatabaseFile .mdb");
$data = $conn->Execute("SELECT * FROM myTable ORDER BY users ASC");

print "<TABLE border='1'><TR><TD colspan='6'>DATA</TD><TR>";
while (!$data->EOF)
{
print "<tr>";
print "<td>" . $ data ->Fields[0]->value . " </td>";
print "<td>" . $ data ->Fields[1]->value . " </td>";
print "</tr>";
$ data ->MoveNext();
}
echo "</TABLE>";


Just save code above as access.php and run it. It's going to be like the screen belown.
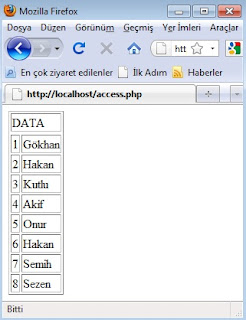
Screen View
If you try to figure that out, codes belown will be helpful for you.

$conn = new COM("ADODB.Connection") or die("ADODB Opps!");
$conn->Open("DRIVER={Microsoft Access Driver (*.mdb)};DBQ=C:\Users\UserName\Desktop\MyDatabaseFile.mdb");

We try to connect access database with php here.

odbc_connect(‘dsn name’, ‘user name’, ‘password’);

There is a problem with this! When you look at the code belown, can realize user_name and password field. What are these ones? How can we build on these? That's the point on this article actually. Just go to the localhost and this page:

phpinfo.php


<?php
Phpinfo();
?>


When run phpinfo.php file, need look into ODBC properties

ODBC with phpinfo.php
You must implement your user name and password for working on it. By the way, it is easier to make this operations with codes. That's why i show you as code, not screen views.

Well, let's code then :)

$conn = new COM("ADODB.Connection") or die("ADODB Opps!");
$conn->Open("DRIVER={Microsoft Access Driver (*.mdb)};DBQ=C:\Users\UserName\Desktop\MyDatabaseFile.mdb");

$data = $conn->Execute("SELECT * FROM myTable ORDER BY users ASC");

print "<TABLE border='1'><TR><TD colspan='6'>DATA</TD><TR>";
while (!$data->EOF)
{
print "<tr>";
print "<td>" . $ data ->Fields[0]->value . " </td>";
print "<td>" . $ data ->Fields[1]->value . " </td>";
print "</tr>";
$ data ->MoveNext();
}
echo "</TABLE>";

This is my result page with php, html and sql.

See you guys next article!

Sunday, June 10, 2012

Installing Fuzuli for Windows

Well, it was difficult to shut down our Linux installed machines and start up Windows after a long time interval. Unfortunately, there are many Windows users around the world that want to try out Fuzuli, our new interpreter which is first introduced in Practical Code Solutions blog.

We compiled Fuzuli using GNU C++ compiler and prepared some Linux packages which are ready to download at Google Code page. In order to compile it Windows, we had to use GNU for Windows, namely CYGWIN. Finally, we have a running copy at hand and it is ready to download in page Download Packages. Installing Fuzuli in Windows is such an easy task. Just follow the required steps and start running and testing Fuzuli.

  1. Go to the page http://code.google.com/p/fuzuli/downloads/list and download Fuzuli for Windows.
  2. The current zip file is fuzuli-win_0.1-4.zip but it depends on the current release. It will have a new name in the future but in the same pattern.
  3. Extract the zip file, for example in C:\, so your Fuzuli folder becomes c:\fuzuli-win_0.1-4.

 Okay, by now on, you will have installed Fuzuli! Let's test it using following steps:
  1. Click button. Select run and type "cmd". Press enter. This will open a terminal screen.


  2. Type "cd C:\fuzuli-win_0.1-4" and type enter. This will get you in the Fuzuli folder. 


  3. Type "fuzuli" and type enter. 
 You would see an output like this:


Fuzuli build Jun  9 2012 12:59:18
usage:
 fuzuli source
 fuzuli --repl


If you see the output shown above, you probably installed Fuzuli successfuly. Lets try a program. There is fzl file shipped with Fuzuli with name fibonacci.fzl. This file is a text file and can be edited a text editor like Notepad or Notepad++. You can run it by typing


fuzuli fibonacci.fzl


and if there is not any problem, the output should be like this:

PASSED!
PASSED!
PASSED!
PASSED!
PASSED!


The output shown above proofs that Fuzuli is ready. You can create your own fzl files and run them in a similar way.

Ok. Let write a world classic, Hello World!. Open your favorite text editor, it is Notepad++ if I work with Windows.

 
Now save it with name "hello.fzl" in some folder. Do not forget where you saved the file. I saved my hello.fzl in directory D:\myfuzuli so it is D:\myfuzuli\hello.fzl


 Okay, see you later in next article!


Saturday, June 9, 2012

How to Use JQuery UI Progress Bar

Hi! As you know, we wrote something about JQuery before. We'd talked about where and how to use it. 


In this article, we're going to learn using progress bar we all know. For using it, have to include the library about this. Like i said, this article is about showing load progress using JQuery UI.


I guess that we all need to load progress while our pages was loading on. All of expert of software think about that is the best way ever. For that reason, this is indispensable for us :)


Well, we'd talked about the libraries. If you learn how to use those, you can visit Jquery web site


Your Html Page should be like:

<div id="progressbar"></div>

When the script stars and loads, progress bar will work on the div layer which's id is progressbar.

This is my jquery document:

$(document).ready(function() {
 var count = 0;
 setInterval(function() {
  count = count + 0.5;
  $('#progressbar').progressbar({
   value : count         
  });
 }, 10);
});

As you see, setInterval function is counting our count and then load the page. I used to 0.5 value. If you want to load faster or slower, can change the 0.5 value, namely value of count.

If you want to see how the demo works, you can visit this page.

Just remember that is an open source project and if you see the code, you can see the code, if you want to get the code, you can get to code also. And libraries we used on the script are here.

We'll see you guys next article!

Friday, June 8, 2012

A Basic QT LCD Number Component Example

In this small example, we demonstrate how to use Qt's LCD Number component with consequent images and codes.

Since Qt is known to be a good GUI library, it has got a collection of classes for general purpose programming on networking, databases and other things.

In our simple example, we have one lcd number component and two buttons for increasing and decreasing the value on it. Events are handling using slots and signals as usual in Qt. First, follow these images.


The C++ code for main.cpp, mainwindow.cpp and mainwindow.h is shown below:


main.cpp
#include <QtGui/QApplication>
#include "mainwindow.h"

int main(int argc, char *argv[])
{
    QApplication a(argc, argv);
    MainWindow w;
    w.show();
    
    return a.exec();
}


mainwindow.cpp
#include "mainwindow.h"
#include "ui_mainwindow.h"


MainWindow::MainWindow(QWidget *parent) :
    QMainWindow(parent),
    ui(new Ui::MainWindow)
{
    ui->setupUi(this);
    this->connect(this->ui->pushButton, SIGNAL(clicked()), this,SLOT(button_Plus_click()));
    this->connect(this->ui->pushButton_2, SIGNAL(clicked()), this,SLOT(button_Minus_click()));
    this->counter=10;
    this->ui->lcdNumber->display(counter);
}

MainWindow::~MainWindow()
{
    delete ui;
}

void MainWindow::button_Minus_click(){
    counter--;
    this->ui->lcdNumber->display(counter);
}

void MainWindow::button_Plus_click(){
    counter++;
    this->ui->lcdNumber->display(counter);
}


mainwindow.h
#ifndef MAINWINDOW_H
#define MAINWINDOW_H

#include <QMainWindow>

namespace Ui {
class MainWindow;
}

class MainWindow : public QMainWindow
{
    Q_OBJECT
    
public:
    explicit MainWindow(QWidget *parent = 0);
    ~MainWindow();

    
private:
    Ui::MainWindow *ui;
    int counter;

private slots:
    void button_Plus_click();
    void button_Minus_click();
};

#endif // MAINWINDOW_H


Good luck!