Wednesday, September 28, 2011

How to configure site to site VPN profile on Linux,

In this little page I will describe how to configure a vpn connection between two different networks. This connection is usually called site2site vpn.


I used ipsectools and recoon projects to establish a vpn tunnel. In Debian distributions, to install required packages we type:

# sudo apt-get install ipsec-tools racoon


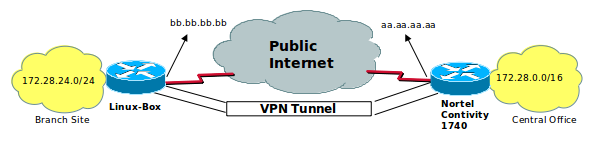
We have to edit some configuration files. I want to explain the related services using the sample configuration. We call Branche Office for the node on the left and central office for the other one. The vpn tunnel is shown in the picture above. The branche office, which is the one we are talking about is a Linux installed machine and the central office is using Nortel Contivity 1740 VPN BOX. The branch office has got 172.28.24.0 / 24 network address. The central office has got 172.28.0.0 / 16 network address. 172.28.0.0 / 16 is for to contain the brache office segment.

But as you know, If you look at from branch office, all other branch offices are behind the central office. So first of all, we have to fix this problem.

The problem is that, if we will define the destination network as 172.28.0.0/16, our vpn box device sends packets through the tunnel interface for accessing to 172.28.24.0 / 24 segment. But 172.28.24.0 / 24 segment is already connected to itself! In this sample, our vpn destination network is 0.0.0.0 / 0. Because, this is a branch office and we want to have full control on internet access requests from the branch office. The spd.conf file (/etc/spd.conf) seems like that;

spdadd 172.28.24.0/24 172.28.24.0/24 any -P in none;
spdadd 172.28.24.0/24 172.28.24.0/24 any -P out none;
spdadd 172.28.24.0/24 0.0.0.0/0 any -P out ipsec ah/tunnel/bb.bb.bb.bb-aa.aa.aa.aa/require;
spdadd 0.0.0.0/0 172.28.24.0/24 any -P in ipsec ah/tunnel/aa.aa.aa.aa-bb.bb.bb.bb/require;


first two lines are required to fix the problem. Last two lines are required to establish vpn tunnel. These are define tunnel source/destination networks and tunnel source/destinatio ends. (aa.aa.aa.aa is ip address of vpn catcher device on the central office and bb.bb.bb.bb is ip address of branch office box. So it is our linux ip address.)

This site to site vpn tunnel is using pre-shared key mechanism. So we need a pre-shared key configuration file. The file seems like that;

aa.aa.aa.aa [pre-shared key]


This file must be located in /etc/racoon directory in our defined system. The other configuration file that located in /etc/rac oon directory is racoon.conf:

listen {
adminsock "/var/run/racoon.sock" "root" "wheel" 0660;
}
path pre_shared_key "/etc/racoon/psk.txt";

path certificate "/etc";

remote aa.aa.aa.aa {
exchange_mode aggressive;
my_identifier fqdn "BranchOfficeName";

peers_identifier address aa.aa.aa.aa;
initial_contact on;
ike_frag on;
support_proxy on;
proposal_check obey;

proposal {
encryption_algorithm 3des;
hash_algorithm md5;
authentication_method pre_shared_key;
dh_group 2;
}
}

sainfo address 172.28.24.0/24 any address 0.0.0.0/0 any {
encryption_algorithm des,3des;
authentication_algorithm hmac_sha1,hmac_md5;
compression_algorithm deflate;
lifetime time 5 min;
pfs_group 2;
}


the racoon.conf file contains this tunnel configuration, source and destionation network addresses and some ipsec option selections. So you can select different encryption options in this file. But the important point is, each ends should have the same selections. bb.bb.bb.bb might be a problem for you if it's changeable. If this ip address is changeable, you have to recognize the current value and you have to update it in /etc/spd.conf file. And then, you have to update it on the running service. You can use setkey command to manage tunnel properties.

setkey -D
setkey -DP
setkey -F
/etc/init.d/setkey {start|stop|restart|force-reload}


-D Dump the SAD entries, -F Flush the SAD entries and /etc/init.d/setkey is initialize shell script.

If you create new spd.conf file in different path, you have to kill existing setkey process (or you can use '/usr/sbin/setkey -F -FP' command) and load new conf file with following command:

kill existing setkey process;

/usr/sbin/setkey -F -FP


start setkey with new spd.conf file

/usr/sbin/setkey -f /etc/spd.conf


Finally, if your Linux box's public ip address is changable you can sense current ip address on external interface and update spd.conf file with following php script. It reads some informations from racoon.conf file. If you don't need these parts, you can mark the line with "#" to make it commented.

The filename is createSpd.php (full path: /root/fwscripts/createSpd.php):

#!/usr/bin/php
<?php
$k = 0;
$i = 1;
while($k < 5){
$lan = exec("/sbin/ifconfig eth0 | /bin/grep 'inet addr' | /usr/bin/gawk -F ' ' '{print $2}' | /usr/bin/gawk -F ':' '{print $2}'");
$wan = exec("/sbin/ifconfig ppp0 | /bin/grep 'inet addr' | /usr/bin/gawk -F ' ' '{print $2}' | /usr/bin/gawk -F ':' '{print $2}'");
//$peer = 'aa.aa.aa.aa'; // you can use this line or following line.
$peer = exec("/bin/grep remote /etc/racoon/racoon.conf | /usr/bin/gawk -F ' ' '{ print $2 }'");

$localNet = exec("/bin/grep sainfo /etc/racoon/racoon.conf | /usr/bin/gawk -F ' ' '{ print $3 }'");
$remoteNet = exec("/bin/grep sainfo /etc/racoon/racoon.conf | /usr/bin/gawk -F ' ' '{ print $6 }'");

$blan = strlen($lan);
$bwan = strlen($wan);

echo "strlen($lan):$blan,strlen($wan):$bwan \n";

if($blan < "6" || $bwan < "6" ) {
echo "LAN or WAN hasn't got usable ip address.\n";
echo "The script wait and will be try again!!! ($i) # # # # # # # # # # # \n";
$i++;
sleep(10);
} else {
echo "writing to /etc/spd.conf file as collected information:\n";
exec("/bin/rm -rf /etc/spd.conf.old;/bin/mv /etc/spd.conf /etc/spd.conf.old");
exec("echo 'spdadd 172.28.10.254/32 0.0.0.0/0 any -P out none;' > /etc/spd.conf");
exec("echo 'spdadd 0.0.0.0/0 172.28.10.254/32 any -P in none;' >> /etc/spd.conf");
exec("echo 'spdadd $localNet $localNet any -P in none;' >> /etc/spd.conf");
exec("echo 'spdadd $localNet $localNet any -P out none;' >> /etc/spd.conf");
exec("echo 'spdadd $localNet $remoteNet any -P out ipsec ah/tunnel/$wan-$peer/require;' >> /etc/spd.conf");
exec("echo 'spdadd $remoteNet $localNet any -P in ipsec ah/tunnel/$peer-$wan/require;' >> /etc/spd.conf");
$k = 5;
}
if($i > 5){
$k = 7;
}
}
echo "FNSH\n";
?>


If you want to manage the setkey process with a shell script, you can practically use the following script.

#!/bin/sh

case "$1" in
start)
echo "Running ipsec VPN rules file: /etc/spd.conf";
/root/fwscripts/createSpd.php
/usr/sbin/setkey -f /etc/spd.conf
;;
stop)
echo "Remove ipsec VPN rules file: /etc/spd.conf"
/usr/sbin/setkey -F -FP
;;
restart)
echo "Remove ipsec VPN rules file: /etc/spd.conf"
/usr/sbin/setkey -F -FP
echo "Running ipsec VPN rules file: /etc/spd.conf";
/root/fwscripts/createSpd.php
/usr/sbin/setkey -f /etc/spd.conf
;;
*)
echo "Usage: /etc/init.d/setkeyHandle {start|stop|restart}"
;;
esac

exit 0


And then, if you want to add this script to boot progress, you can use update-rc.d command in Debian based Linuxs like following,

# update-rc.d setkeyHandle defaults
Adding system startup for /etc/init.d/setkeyHandle ...
/etc/rc0.d/K20setkeyHandle -> ../init.d/setkeyHandle
/etc/rc1.d/K20setkeyHandle -> ../init.d/setkeyHandle
/etc/rc6.d/K20setkeyHandle -> ../init.d/setkeyHandle
/etc/rc2.d/S20setkeyHandle -> ../init.d/setkeyHandle
/etc/rc3.d/S20setkeyHandle -> ../init.d/setkeyHandle
/etc/rc4.d/S20setkeyHandle -> ../init.d/setkeyHandle
/etc/rc5.d/S20setkeyHandle -> ../init.d/setkeyHandle


If you don't want to use default values, you can define your values in the update-rc.d command like following;

# update-rc.d setkeyHandle start 20 2 3 4 5 . stop 80 0 1 6 .

Passing plain Java objects to R using RCaller

Well, you are using RCaller for your statistical calculations. Probably, you are passing your double arrays to R and type some R commands in order to get the desired outputs. After a calculation process, you handle the returned arrays through the parser. This is the general use of RCaller.

Suppose that you have got a Java class which has got some variables with data types int, short, long, float, double and String. This class also includes some arrays of types int[], double[], ..., String[]. Of course it may include some functions, constructors or anything else. But we don't care about this for now.  How about passing this class with its publicly defined variables to R? Yeah! It is possible in its last submitted revision.

Have a look at the Java class below:


class TestClass {

  public int i = 9;
  public float f = 10.0f;
  public double d = 3.14;
  public boolean b = true;
  public String s = "test";
}

This class simply includes five publicly defined variables with basic data types. Our other class inherits the TestClass and defines some additional arrays:


class TestClassWithArrays extends TestClass {

  public int[] ia = new int[]{1, 2, 3, 4, 5};
  public double[] da = new double[]{1.0, 2.0, 3.0, 4.0, 9.9, 10.1};
  public String[] sa = new String[]{"One", "Two", "Three"};
  public boolean[] ba = new boolean[]{true, true, false};
}

Ok, they are very simple but there is no reason those classes not to have any methods. Whatever those classes have methods, we consider them as data structures.

Lets pass this data structure to R:


TestClassWithArrays tcwa = new TestClassWithArrays();
    JavaObject jo = new JavaObject("tcwa", tcwa);

    RCaller rcaller = new RCaller();
    rcaller.setRscriptExecutable("/usr/bin/Rscript");
    rcaller.cleanRCode();

    rcaller.addRCode(jo.produceRCode());
    rcaller.runAndReturnResult("tcwa");


Well, if there is no expection we have the results in a R list named "tcwa". This R list includes all of the elements that included in TestClassWithArrays and TestClass with their values.

This is an example of proof, the related @Test method is ready for browsing in the Google Code:

@Test
  public void TestClassWithArrays() throws IllegalAccessException, IOException {
    TestClassWithArrays tcwa = new TestClassWithArrays();
    JavaObject jo = new JavaObject("tcwa", tcwa);

    RCaller rcaller = new RCaller();
    rcaller.setRscriptExecutable("/usr/bin/Rscript");
    rcaller.cleanRCode();

    rcaller.addRCode(jo.produceRCode());
    rcaller.runAndReturnResult("tcwa");

    int[] expectedIntArray = rcaller.getParser().getAsIntArray("ia");
    for (int i = 0; i < tcwa.ia.length; i++) {
      assertEquals(expectedIntArray[i], tcwa.ia[i]);
    }


    double[] expectedDoubleArray = rcaller.getParser().getAsDoubleArray("da");
    for (int i = 0; i < tcwa.da.length; i++) {
      assertEquals(expectedDoubleArray[i], tcwa.da[i], delta);
    }

    String[] expectedStringArray = rcaller.getParser().getAsStringArray("sa");
    for (int i = 0; i < tcwa.sa.length; i++) {
      assertEquals(expectedStringArray[i], tcwa.sa[i]);
    }

  }

It is shown that in examples, in R side, we can access to elements with their original names that defined in the Java class. That sounds good.

Finally, we can pass our Java objects with defined contents. This use of RCaller narrows the code of addDoubleArray, addIntArray and reduce all of them to simple command of

 JavaObject jo = new JavaObject("tcwa", tcwa);
.
.
.
rcaller.addRCode ( jo.produceRCode() );
 

It is simplicity...

Friday, September 23, 2011

How to follow up temperature of system room,

able to visit following link For more example and with different devices like hp, cisco, netscreen..;
http://stdioe.blogspot.com/2011/10/checking-system-room-temperature-with.html
also should be check http://stdioe.blogspot.com/2011/11/nokia-application-for-system-room.html article. This article contain a mobile phone client application to follow up to system room temperature..


I needed to find a solution for the question above for the company which I'm working for. I wanna talk about my quick solution in this article.

There are several IMB Blade chassis, cisco routers, Juniper devices, HP / IBM rock mountable servers, Cisco/Hp/Nortel swithces etc. in my system room.. Actually, there are many alternatives but I selected the IBM Blade chassis to read data of temperature. Because, It contains a lot of blade servers and they are really business critical. Somehow that blade chassis should always be powered on..

I have a Linux server for monitoring the network and something like that. It has got Apache Http Server, MySQL server, a Perl interpreter, a Php interpreter installed. I created a DB and a table to record temperature values. I wrote a script to connect to IBM blade chassis and get temperature value. This script gets the values and record them to a text file;

Read data from IBM Blade Chassis (read.pl);

#!/usr/bin/perl
use Net::Telnet ();
$t = new Net::Telnet (Timeout => 10);
$t->open("x.x.x.x");
$t->login("USERID", "password");
$t->cmd("env -T system:mt[1]");
@lines = $t->cmd("temps");
#print @lines;

open (HEDEF, ">/root/ibmTemperature/lastTemp.txt") || die ("Could not open file
$!");
print HEDEF "@lines";
close (HEDEF);


recorded data to the lastTemp.txt file is like this;

              Warning
Value Warning Reset
----- ------- -------
25.00 38.00 33.00
...
..
.


I need the first value; the value of 25.00 at line 1. Use following command to eleminate unwanted parts.

echo `/usr/bin/head -4 /root/ibmTemperature/lastTemp.txt | /usr/bin/tail -1 | /usr/bin/gawk -F ' ' ' {print $1} '`> /root/ibmTemperature/tempfile.txt

Write data to MySQL table (write.php);

I decide to use different languages for each step. The following php script reads the data from blade chassis, writes the data to mysql database server

#!/usr/bin/php


I did set to execution permission to the script given above. I also wrote the interpreter path to head of the script source. So therefore, I can execute it directly. I also have to say, I almost always use the full path names in all scripts. Because, if I use relative paths in the scripts, I need login on the treminal / console to execute it to get $PATH variable value from environmental values structure. But, If I use full path in my scripts, I can execute it from everywhere (for example, execute from crontab)

shell script for execute all (run.sh),

#!/bin/bash
/root/ibmTemperature/read.pl
echo `/usr/bin/head -4 /root/ibmTemperature/lastTemp.txt | /usr/bin/tail -1 | /usr/bin/gawk -F ' ' ' {print $1} '`> /root/ibmTemperature/tempfile.txt
/root/ibmTemperature/write.php


Now, I can add run.sh script in the crontab for executing it once a minute and run.sh script to be able to trigger the read.pl, write.php and some linux commands. And now, I have to explain that linux commands;

a) The head is captured from first 4 lines of lastTemp.txt text file. The pipe captures an output from that head and inputs to tail command. So tail command captures the last line from the output of head command and next pipe creates an input for gawk..

This structure is being executed once a minute for adding the current temperature information to MySQL table with mktime date/time format. The following php script creates a clear output for users on a web-page. (my webpage hosted on /systemRoom/ directory in web root directory.)


System room temperature graphic (Last 24 Hours):";
echo "";
echo "";
echo "\n";
$k = 0;
while($line = mysql_fetch_array($result)) {
$current = (3*$line["temp"]);
$current_temp = $line["temp"];

if($current < "72") { $color = "lightblue.PNG"; } elseif($current < "85") { $color = "blue.PNG"; } else { $color = "red.PNG"; } if($k == 0) { $now = $line["date"]; } else { if(strlen($line["date"]) > 5) {
$end = $line["date"];
}
}

echo "\n";
}
echo "";
//echo "";
echo "

";
echo "";
echo "";
//echo "Now (0 point on graphic): ".date("Y/m/d - H:i:s", $now)."
Oldest (End point on graphic): ".date("Y/m/d - H:i:s", $end)."
";
?>


";
echo "";
echo "


: Recommended Values Range

: Acceptable Values Range

: Dangerous Values Range

Thursday, September 22, 2011

How to Connect Juniper Netscreen Device using Perl Scripts

The site http://search.cpan.org contains a usable and easy library to connect netscreen devices. Name of the library is Net::Telnet::Netscreen. Its use is straightforward:

#!/usr/bin/perl
use Net::Telnet ();
$t = new Net::Telnet (Timeout => 10,
Prompt => '/ns5gt-adsl->/');

$t->open("IP_ADDR_of_NetscreenDevice");
$t->login(netscreenUsername, Password);
@lines = $t->cmd("get policy id X");
print @lines;
$t->cmd("exit");
$t->cmd("exit");


IP_ADDR_of_NetscreenDevice, netscreenUsername and Password expressions can be replaced with an address, an username and a password, respectively.

How to Connect Cisco Router with Perl Scripts

( Click for PHP version: http://stdioe.blogspot.com/2011/11/how-to-connect-cisco-router-with-php.html )

First of all, I have to explain how to configure the Cisco router for telnet connectivity. Because, the Cisco router supports the telnet password and privilege password, It also supports username and password combination for logging in. So there are two different type to logging in.

The following explanation of Cisco router configurations are from stratch. So we have to connect to router via console cable (rollover cable) and serial port on computer and terminal application. If you use MS Windows operating system, you can use Hyper terminal or different third party terminal applications. If you use Linux operating system, you have several choices. I usually use the minicom in my personel use laptop . But the problem is that It hasn't got any serial ports. The solution is to use the usb to serial converter adapter with requisite drivers installed in my Linux.

Router-A Configuration:
Router> Enable
Router# configure Terminal
Enter configuration commands, one per line. End with CNTL/Z.
Router(config)# enable secret 0 cisco
Router(config)# line vty 0 4
Router(config-line)#login
% Login disabled on line 6, until 'password' is set
% Login disabled on line 7, until 'password' is set
% Login disabled on line 8, until 'password' is set
% Login disabled on line 9, until 'password' is set
% Login disabled on line 10, until 'password' is set
Router(config-line)#password cisco
00:00:54: %SYS-5-CONFIG_I: Configured from console by console
Router(config-line)# ^Z
Router#write memory

The following perl script to connect to Router-A without AAA;

#!/usr/bin/perl

use Net::Telnet::Cisco;
my $session = Net::Telnet::Cisco->new(Host => 'x.x.x.x');
$session->login('', 'password');

# Execute a command
my @output = $session->cmd('show version');
print @output;

# Enable mode
if ($session->enable("enable_password") ) {
@output = $session->cmd('show privilege');
print "My privileges: @output\n";
} else {
warn "Can't enable: " . $session->errmsg;
}

$session->close;

After than write this perl script above, of course you have to add execution permission to script file. For example, if the file name of this script is sample.pl then simply type

chmod +x sample.pl

Router-B Configuration (Updating to AAA model):

Router(config)#aaa new-model
Router(config)#username TelnetUser privilege 15 password 0 TelnetPassword

The following perl script to connect to Router-B;

The difference between the first sample and the second sample is that,
first router configuration is done with telnet password and password.

Anyway you can use the Net::Telnet::Cisco Library which is written in Perl. If you are using a Linux Distro, probably your package manager already contains it.

#!/usr/bin/perl

use Net::Telnet::Cisco;

my $session = Net::Telnet::Cisco->new(Host => 'x.x.x.x');
$session->login('TelnetUser', 'TelnetPassword');

# Execute a command
my @output = $session->cmd('show version');
print @output;

# Enable mode
@output = $session-> cmd('show privilege');
print "My privileges: @output\n";
$session->close;

If you want to add "Net::Telnet:Cisco" or something like that manually, you can search the related perl library on site http://search.cpan.org.
For Example http://search.cpan.org/~joshua/Net-Telnet-Cisco-1.10/Cisco.pm link is used in the sample we have just given.
And you can also download http://search.cpan.org/CPAN/authors/id/J/JO/JOSHUA/Net-Telnet-Cisco-1.10.tar.gz compressed file.

Note:
After extracting it, enter extracted directory. Execute perl Makefile.PL.
The "make" and "make install" commands produces the output below:

user@hostn:~/DIR> tar xvfz Net-Telnet-Cisco-1.10.tar.gz 
Net-Telnet-Cisco-1.10/
Net-Telnet-Cisco-1.10/README
Net-Telnet-Cisco-1.10/Cisco.pm
Net-Telnet-Cisco-1.10/.cvsignore
Net-Telnet-Cisco-1.10/MANIFEST
Net-Telnet-Cisco-1.10/test.pl
Net-Telnet-Cisco-1.10/MANIFEST.SKIP
Net-Telnet-Cisco-1.10/Changes
Net-Telnet-Cisco-1.10/INSTALL
Net-Telnet-Cisco-1.10/Makefile.PL
Net-Telnet-Cisco-1.10/TODO
user@hostn:~/DIR> cd Net-Telnet-Cisco-1.10/
user@hostn:~/DIR/Net-Telnet-Cisco-1.10> perl Makefile.PL

Checking if your kit is complete...
Looks good
Writing Makefile for Net::Telnet::Cisco
user@hostn:~/DIR/Net-Telnet-Cisco-1.10> make
cp Cisco.pm blib/lib/Net/Telnet/Cisco.pm
AutoSplitting blib/lib/Net/Telnet/Cisco.pm (blib/lib/auto/Net/Telnet/Cisco)
Manifying blib/man3/Net::Telnet::Cisco.3pm
user@hostn:~/DIR/Net-Telnet-Cisco-1.10> make install
!!!!!!!!!!!!!!!!!!!!!!!!!!!!!!!!!!!!!!!!!!!!!!!!!!!!!!!!!!!!!!!!!!!!!!!!
ERROR: Can't create '/usr/lib/perl5/site_perl/5.12.3/Net/Telnet'
Do not have write permissions on '/usr/lib/perl5/site_perl/5.12.3/Net/Telnet'
!!!!!!!!!!!!!!!!!!!!!!!!!!!!!!!!!!!!!!!!!!!!!!!!!!!!!!!!!!!!!!!!!!!!!!!!
at -e line 1
make: *** [pure_site_install] Error 13
user@hostn:~/DIR/Net-Telnet-Cisco-1.10> sudo make install
root's password:
Appending installation info to /usr/lib/perl5/5.12.3/i586-linux-thread-multi/perllocal.pod
user@hostn:~/DIR/Net-Telnet-Cisco-1.10>

The last step is installing which is required root permissions. So When used without root permission, It returned an error than used "sudo" to get root permission, It finally successful.